24 October 2021

Technique Tuesday: Watercolor Christmas cards

Hello, friends! 

I'm super excited to be back today sharing MORE Technique Tuesday creations!!! 

I love being challenged to create using certain products and a theme or design style. It really helps me get into my creative flow! Sometimes I think outside the box, and sometimes I follow the theme exactly the way it was presented. Either way- I enjoy "specifics" that aid in pushing my creativity 😉 

The challenge/request: TT requested watercolor Christmas cards. Sounds easy and the ideas started to flow quickly! That was until I realized I wasn't doing the challenge or request correctly 🤦🏼‍♀️ I had forgotten to use watercoloring! LOL Don't worry! I completed the challenge, and I really love how everything turned out:) 

The first few creations use the TT Sweater Weather die. I went really simple with this first card **NOTE: Simple doesn't always mean easy! LOL! I embossed the die multiple times on a piece of watercolored paper, and a reflective silver Washi tape, dainty thread and bow, as well as a sentiment and confetti pieces added just the right finishing touches to this card. It's simple yet packed with detail all from that die
This card is perfect for mass producing with different watercolored backgrounds or as holiday Thank Yous or even as a smaller version too. Honestly, this die and card design could be used for just about any occasion with a flip of the colors and sentiments! I love it! 
Techniques: watercoloring, dry embossing, stamping, layering, CAS

The next two cards are a combo. One uses the scraps from the previous design, which is another thing I love- using up scraps for all projects:)

Both cards use the TT Sweater Weather die as the main design. I paper pieced the die image after running it through a die cut machine multiple times on the card base. 

Q: Where's the watercoloring element?
A: It might be hard to see in the first card, but the little green pieces from the die were watercolored. I used the scrap from this watercolored piece of paper for my next card! 
Techniques: watercoloring, die cutting, stamping, embossing, layering

Here's the scrap! I love how this card turned out-- all that gold and green together with a maroon bow! BEAUTIFUL! This color combo and design makes me think of fancy holiday parties and gatherings! 
Techniques: watercoloring, die cutting, layering, CAS, using scraps

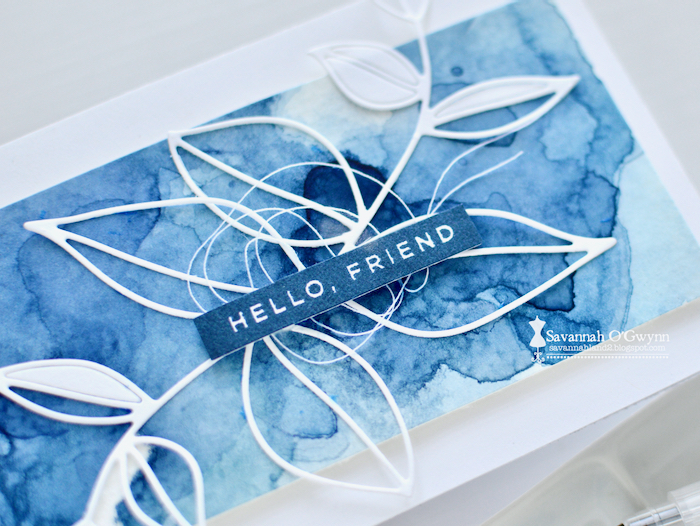
I went with a silhouette design next. The perfect stamp bundle for this creation is the TT Nativity Silhouettes and Christ is Born sets! Another simple card for the win! The hardest part of this design was creating the watercolored background! LOL! I just couldn't get the navy-black color I wanted. I tried multiple times. This piece probably dried three or four times before getting just the right color for the night sky. #worththewait 
You might think that masking the sentiment and nativity scene so that I could emboss with two different colors would be the hardest part- but not for me! One of my favorite techniques is masking sentiments/images:) 
Techniques: watercoloring, stamping, masking, embossing, CAS

And finally, I wanted to finish with a fun & cute design (which is really my style-- however, I went with a CAS + one layered fun & cute card.... which is NOT my style! LOL!). I used the TT Hello Winter stamp set- perfect for fun & cute! 
There are three steps for this card: stamping, embossing, and coloring. Super EASY! I did add a some fluffy elements to the boots and jacket so it wasn't sooooooo one layered:) LOL! 
As soon as I sent this photo to Trav (for his approval), he responded with "You say that all the time!" I live in Florida, and I'm honestly COLD almost ALL the time (our thermostat is set to 78* most of the year)!!! 
Techniques: watercoloring, stamping, embossing, CAS, one layer

I hope this helps you get into the holiday spirit--- Christmas will be here before you know it! 


Be sure to check out the Christmas & Winter Collection of stamps and dies, as well as bundles, HERE on the Technique Tuesday website!


THANKS so much for stopping by! 
Be blessed ❤️
Sav

03 October 2021

Catching up:)

Hello, friends! 

I apologize for the lack of posting-- sometimes it's hard for me to keep up with the demands of blogging and social media (which includes: stories, posts, videos, etc)! I'm hoping to do better with this in the future. I probably have over 200 creations to share with you that have never been seen! LOL! I am really behind😉

Here are a few creations that I shared on Instagram recently. 

First up is a bear-y cute card I created after being inspired by a toddler shirt found at Walmart! You can check it out HERE on Instagram. 
I created the next two cards for some friends who needed to be lifted up. It's been a hard 18 months (maybe even MORE)! Click HERE for more details on Instagram. 
Unfortunately, these next two cards were needed after a sweet friend passed away. I knew I wanted to make something special and with a rose (as her name was Rose)... and I settled on these two designs for the family. I love how they turned out. I think I might make more of these using different colored cardstock (i.e. navy, dark green). More details and photos are HERE on Instagram. 
And finally... I joined the shaker card wagon! I do not like doing things that are trendy, but I just had to make these special shaker birthday cards. They are fun to make, and I have a feeling I will be making more soon:) Click HERE for Instagram details. 
That's it for me today! I have MORE to come- 196 more creations to share! LOL! 

I hope you are doing well <3 THANKS so much for stopping by!    

Be blessed ❤️
Sav

19 September 2021

Technique Tuesday: Travel Promo

Hello, friends! 

I'm back (after a long break from blogging- it's a lot of work to write a post! LOL!) and super excited to share several projects today featuring some Technique Tuesday's stamps and dies. ***BONUS: Technique Tuesday has a SALE going on this weekend-- use code SHIP30 for 30% off $30 or more!

I might have been absent from the internet and blogging... but I've been super busy in my studio creating these special projects for this promotion! I have a few projects to share today including one of Trav's FAVORITE designs. 

For my first project, I created a magnetic vacation countdown frame using the Technique Tuesday My Trip stamp set and Amazing Arrows dies. As soon as I saw this set I knew I wanted to make a fun project that everyone could see in the home or office. 

Countdowns are fun for just about any occasions (birthdays, vacations, baby's due dates, Christmas, anniversaries, etc)! My vacation countdown has many different details: masked words, layered background (for dimension- even if it is behind the frame glass), and a marquee sentiment that was stamped on transparency paper! It's so fun! 
Techniques: fussy cutting, masking, die cutting, layering, stamping, transparency paper, marquee letters

I created the bent arrow (90* angle) by using a technique, partial die cutting, that I shared in a video 4 years ago. You can check it out HERE
Die cut only part of the arrow by moving the top plate over. Be sure to tape down your die image! 
This look like the same photo, but it's not! Flip the arrow and die cut again but not all the way to the previous cut. 
Use a cutting knife to carefully remove the arrow from your paper! This is an EASY technique and a great way to modify your dies! 

Supplies: TT My Trip stamps and Captions and Labels dies, Amazing Arrows dies; Ranger Oxide Distress inks: Faded Jeans, Speckled Egg, Pumice Stone; Archival ink: Jet Black; American Crafts Buenos Dias! 12x12 paper; magnetic photo frame and dry erase marker


Trav wanted to photobomb my picture because this is one of his favorite projects! LOL! 


I wanted to do something super simple for my next project, and I found the perfect pre-made cardbases from Joann's! This CAS travel card set is perfect for the adventurous friend, family member, or graduate! You could even give these to someone who is starting a new job or moving. You really can't go wrong with a simple sentiment embossed in gold on a fun cardbase (and this stamp set has multiple sentiments perfect for a card set!!!)! EASY! 
Techniques: CAS, stamping, embossing
Supplies: TT Adventure Awaits; ICT VersaMark ink and gold embossing powder; Place & Time Summertime Papercrafting cards and envelopes

After some simple designs, I wanted to push myself to focus on fussy cutting the globe image in the TT Adventure Awaits stamp set. This card was easy to make, but it really pushed my creativity style. I usually work with bold colors and patterned papers. This is more vintage and sophisticated (well, at least that's what I think when I see it! LOL!). 


This design actually was a mistake at first. I messed up my masking technique because I FORGOT to mask the word "new"! I was going to have it on a tiny tag with the airplane and then stapled to the globe. When I forgot to mask while stamping, I had to redesign that area. The sentiment is off centered due to this mistake, but I really like how it turned out overall:) 

 I love that matching map paper in the globe! So fun!  
Techniques: fussy cutting, stamping, layering, embossing, masking (not really)
Supplies: TT My Trip and Adventure Awaits stamps; ICT VersaMark ink; WOW Embossing Powder Metallic Platinum Super Fine; The Stamp Market Jade and Slate ink, Jade paper; American Crafts The color of Memories papers; Bazzill Basics Paper Kraft


I went really out of my comfort zone for my final creation! I was inspired by a travel themed card and video by Stamping with Alice. I don't normally use transparency paper or stamp on the inside of cards... but her card was so cute that I had to recreate it using my TT Adventure Awaits stamps. I used the same papers as I did for the previous card (I already had them on my desk- why not!? LOL!). This card was actually SUPER easy to create! 
I love that the compass MOVES! Both the inside and the outside compass move together when you spin the circle:) 
NOTE: For some unknown reason, the next to photos are a different color ??? Either way, it shows the inside of the card. I used a very small (and very OLD- at least 10 years old) brad for the spinning compass piece. It was perfect for this idea of having both compasses spin! 
Techniques: clear view, stamping inside a card, embossing, stamping, die cutting, layering

Supplies:  TT Adventure Awaits stamps; ICT VersaMark ink; WOW Embossing Powder Metallic Platinum Super Fine; The Stamp Market Navy paper and ink; Bazzzill Basics Paper Kraft; American Crafts The Color of Memories; Inspired by Alice Tomal


I think these creations using just a few Technique Tuesday stamps and dies were fun to create and really stretched my crafting abilities! I hope you are inspired by them! And don't forget to shop their SALE HERE!! ****SALE ends Sunday night!!


THANKS so much for stopping by! 
Be blessed ❤️
Sav

08 June 2021

first try rejects and the final project after try #2

Hello, friends! 

I have soooooooooooo many projects to share... and I've come up with a quick way to share them all within a few posts. You might be seeing lots of different designs (and not a lot of details) per post to make it easier on me! LOL! 

Today I'm sharing a project that I created in April for a sweet and dear friend, Kim! I love celebrating her birthday and this year she turned 50. That meant I needed to make a super special birthday card. 
I had a few ideas that included watercoloring a piece of paper one solid color. I tried this with a teal and navy (you can see them in the watercolor bin). I thought that I could then add colors to the areas where the flowers would be... but that didn't work out at all! #totalfail I set those two papers aside and started again focusing on watercoloring after I die cut the paper with the design first. I posted about it HERE on Instagram. 
HERE's stage two. It's looking much better than my first attempt! 
I finished this card and absolutely loved the design! Best fail ever! I think Kim enjoyed it too. My mom loved it so much that she requested I make another one just like it. *It was hard to replicate but I did it for my mom! LOL! 
Supplies: The Stamp Market watercolor palette, Just Add Flowers stamp set, Floral Cuts cover die

So what did I do with the first try rejects? Well... I used them for another project two weeks later! It took me that long to figure out what I wanted to do with them. The papers were watercolored teal and navy with different hues and markings. I wanted that to stand out and so I used them on a CAS white card base with a few die cuts and sentiments. EASY! And to be honest, I love how they turned out! Rejects aren't really rejects unless you throw it away. #lifelesson 

This "Thank You" card was created for a sweet couple that became family to me during Covid. They took private aqua fitness classes from me to stay active before they moved back home to WI. I knew the husband loved flowers (his wife's name is Rose! LOL!), so I made a simple white embossed flower bouquet the focal point of this card design. 
Supplies: The Stamp Market watercolor palette, Framed Floral, Gorgeous Greetings, Emboss ink

The navy rejected paper was big enough to make two cards! I love the bold navy with the white background.
Supplies: The Stamp Market watercolor palette, Botanical Print, Botanical Beauty die, Palm Leaf die, Navy/Slate paper and ink

I never throw anything away, and it's a good thing! These cards are some of my favorite! And I learned that rejections are not always bad; good can still come from it. 


That's it for me today. I will be sharing more soon! THANKS so much for stopping by!    

Be blessed ❤️
Sav 

31 May 2021

Alcohol Ink + Under the Sea Baby card

Hello, sweet friends! 

I have absolutely missed being in the studio and creating!!! It has been SUPER crazy here the last two months! I barely had time for anything. Here's what I've been up to: 
  • I had to change my schedule to study for my AEA exam (MORE details on that later)
  • I started teaching aqua fitness classes at our community (6 group classes a week and 2 private classes)
  • I am still in a boot so that is interesting figuring out aqua fitness instruction on the deck and trying to rest it
  • I also was asked to create some special cards for TT's birthday promotion a week ago (click HERE for details).... and basically that has been L.I.F.E. 
All of that to say--- it's goooooooood to be back in the studio! And the *best* news will be shared soon! 

Anyhoo... back to my creation for the day🙃 I was asked by a sweet friend to create a baby card with an underwater theme, using teal, blue, green, purple/lilac colors. I was given a month to create it, and it took 29 days! LOL! 

I absolutely loooooooove how this card turned out. It started with some Etc. Papers Synthetic EVO Papers and alcohol inks. Now, if you know me... then you know I love bold colors and lots of inks when working with this technique! However, I went light with the ink; I even "watered it down" using alcohol. I thought it would be prettier if I created a soft look for a baby card. 
Next I cut the background up and created a second paper using bolder/additional alcohol colors for the critters. I stamped the images using ICT Stazon Jet Black ink and the My Sweet Petunia Misti. I couldn't have done it without this little gadget! 
I fussy cutting each Paper Smooches sea themed image (all sets retired 😞) and die cutting the baby sentiment by The Stamp Market
Finishing was easy- adhere and layer every fussy cut and die cut image... and DONE! I love how this turned out! 
That's it for me today. I have at least 15 different backgrounds using alcohol inks just waiting for me to create with them! So there will be MORE to share soon! I also have about 50 birthday cards to complete as well. LOL! Now that I have the time, I will post more:) 

THANKS so much for stopping by!    

Be blessed ❤️
Sav


Supplies
Paper: Etc. Papers Synthetic EVO Papers, Doodlebug White Glitter, vellum 
Inks: Ranger alcohol inks- Botanical, Patina, Purple Twilight, Limeade, Pistachio, Stream; ICT Stazon Jet Black
Stamps/dies: The Stamp Market Baby Layering diePaper Smooches Surf & Turf and Courteous Cuties stamp sets (retired)


ps... if you are interested in purchasing my cards, you can check them out on my Facebook PageSavannahland2ForSale!!! Click HERE for the photo album of the cards for sale:)